Create SRV Records: Difference between revisions
No edit summary |
|||
| Line 3: | Line 3: | ||
First of all we need to create an A record to point the SRV record to, browse to your domain and add a record like below. | First of all we need to create an A record to point the SRV record to, browse to your domain and add a record like below. | ||
[[File:SRV1.png| | [[File:SRV1.png|alt=|border]] | ||
After you press "Add Record" we need to add a SRV record change the dropdown menu from A to SRV, then click in the textbox next to SRV dropdown, and fill in the box like below. | After you press "Add Record" we need to add a SRV record change the dropdown menu from A to SRV, then click in the textbox next to SRV dropdown, and fill in the box like below. | ||
| Line 13: | Line 13: | ||
The name should be what you want the user to be entering to connect, in this example if a user typed in example.com in to the TeamSpeak client it would send a client to ts.example.com:9987, | The name should be what you want the user to be entering to connect, in this example if a user typed in example.com in to the TeamSpeak client it would send a client to ts.example.com:9987, | ||
[[File:SRV2.png| | [[File:SRV2.png|alt=]] | ||
Press save, then click in the next box and fill that in like below. | Press save, then click in the next box and fill that in like below. | ||
| Line 25: | Line 25: | ||
The target in this option box should point to the A record we made at the start. | The target in this option box should point to the A record we made at the start. | ||
[[File:SRV3.png| | [[File:SRV3.png|alt=]] | ||
Press Add Record. In the end you should have something that looks like below. | Press Add Record. In the end you should have something that looks like below. | ||
[[File:SRV4.png|frameless]] | [[File:SRV4.png|frameless|955x955px]] | ||
Try connecting to your server now, you should be all set. | Try connecting to your server now, you should be all set. | ||
Latest revision as of 08:48, 6 January 2021
SRV records allow end users to type in a domain and be directed to the server without needing a port. This is useful when using shared TeamSpeak hosts or when you're hsoting your own TeamSpeak and your TeamSpeak server does to run on the same IP as your webserver.
Creating an SRV record in CloudFlare
First of all we need to create an A record to point the SRV record to, browse to your domain and add a record like below.
After you press "Add Record" we need to add a SRV record change the dropdown menu from A to SRV, then click in the textbox next to SRV dropdown, and fill in the box like below.
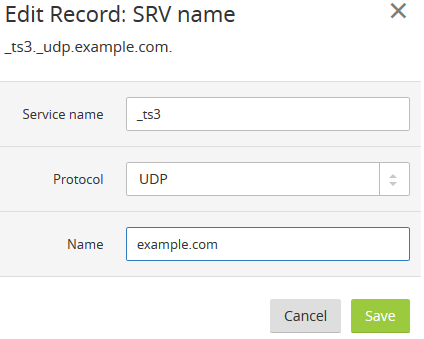
The Service name should always be _ts3.
The Protocol should always be UDP.
The name should be what you want the user to be entering to connect, in this example if a user typed in example.com in to the TeamSpeak client it would send a client to ts.example.com:9987,
Press save, then click in the next box and fill that in like below.
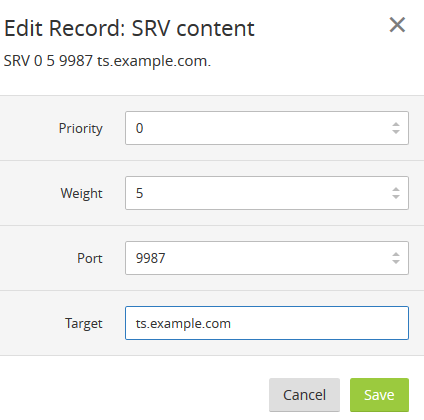
Priority should always be 0.
Weight should always be 5.
The port here is your TeamSpeak servers port.
The target in this option box should point to the A record we made at the start.
Press Add Record. In the end you should have something that looks like below.
Try connecting to your server now, you should be all set.


